Friday, May 8, 2015

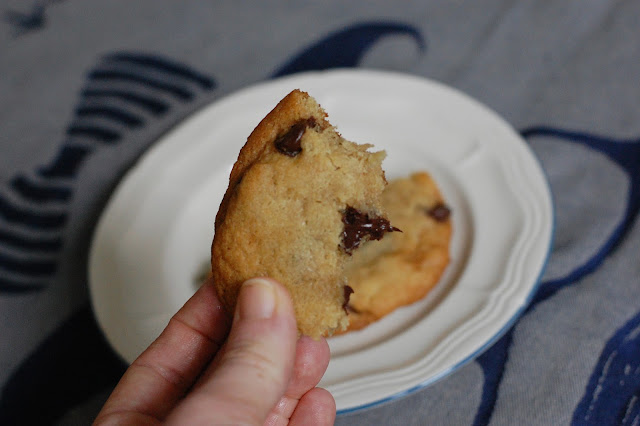
Browned Butter and Sea Salt Chocolate Chip Cookies


I love cookies.  Chocolate chip to be exact.  Honestly, I don't think I could live without them.  If I had to choose my last meal, it would be a fresh batch of chocolate chip cookies.  Andrew actually loves cc cookies as well, so I make them fairly often in our house.  Over the past few years I have started to brown the butter, which adds a richer flavor to the cookie.  Andrew loves them like this, which is why I keep making them.  I guess I happen to love them too.


Ingredients:
*1 cup (2 sticks) of browned butter
3/4 cup brown sugar
3/4 cup granulated sugar
2 eggs
1 tsp vanilla
2 1/4 cup AP flour
1 tsp baking soda
1 tsp sea salt
A dash of cinnamon
1 3/4 cup chocolate chips (add more if you like!)

Preheat oven to 375 degrees.  In an electric mixer, beat sugars and browned butter together until well combined. Add your eggs, one at a time, until fully incorporated. Mix in the vanilla.

In a separate bowl, mix your dry ingredients together (why cinnamon you may ask? Well I love cinnamon, that's why).  Slowly add your dry ingredients until your flour is almost mixed in.

Then add your chocolate chips.  Only mix a few times, you don't want to over mix your batter.

Bake for 10 minutes, flipping your cookie sheet half way through.  If you like crispier cookies add a few minutes.  If you like to make oversize cookies, like I do, you want your total bake time to be closer to 13 minutes.

Adapted from the good old Nestle chocolate chip cookie recipe


*Browning butter*
Let your butter sit out at room temperature for about an hour, this will help the browning process go faster.

Put the butter in a small sauce pan over med heat.  Let the butter melt which may take a few minutes.  Just hang out, it takes some time.

Once the butter is fully melted you will begin to hear the butter crackle and pop.  This is normal, no need to worry.  The butter will then go through some phases.  It will start to bubble and look frothy, then it will be a bit more clear.  Whatever you do, don't walk away!  The butter browns quickly and you don't want it to burn.

Finally you will start to see brown bits in the bottom.  When this happens turn your heat off, but keep the pan on the stove.  Once the brown bits begin to be more pronounced, remove the pan from the stove and transfer the butter to a heat safe bowl or container to cool.  Let cool to room temp before using.


Wednesday, May 6, 2015

Knox's Nursery


Some may know the story, but we had originally intended not to find out the (Knox's) gender. Well at 28 weeks we went to the doctor for a routine appointment.  Our normal doctor was out so we had to see another doctor in our practice and this other doctor slipped the gender... or what we thought was the gender. This doctor walked into the room, looked at our chart, then walked up to me and asked "so y'all are having a girl right?"

Whatttttt, who says that??!!!

To make a long story short, we decided it would be wise to confirm the gender with our normal doctor since we thought the baby could be a girl, but were not positive.  At our next appointment we checked with our doctor and found out that we were actually having a boy.  We were both so surprised based on our previous appointment.  Since we found out at 30 weeks and had already registered for all gender neutral items, we decided that we wanted to keep the gender a surprise.  Most of our family and friends were aware of the story and were dying to know the gender.  It was so hard to not slip, but we thankfully didn't (a few friends may have figured it out) and everyone was surprised when Andrew walked out of the hospital room to deliver the news.

The funny thing about our nursery is that I picked out all the bedding, when I thought we were having a girl.  I tend to like more neutral/masculine colors, and figured I would add a bit of pink once the baby arrived.   Below you will find pictures of the nursery, along with details about its contents. Pictures from the fabulous Rebecca of Rebecca Lynn Photography.


- Crib from Ikea, painted with Annie Sloan chalk board paint
- Bumper, sheets and blanket from the PB kids preston collection
- Zinc letters from Anthropologie
- Gray and white pouf from Kohl's
- Changing table baskets from Land of Nod
- Changing pad cover
- Half tone rattan floor basket
- Rug from PB kids
-Pinocchio pictures from our trip to Italy last year, painting made by a friend's mother and mobile made by a good friend.


Monday, April 20, 2015

Rebecca Lynn Photography


I'm so excited to share more of our newborn pictures and tell you all about Rebecca Olson, the talent behind Rebecca Lynn Photography.  I'll be honest, I was very apprehensive and nervous about taking newborn pictures.  Being camera shy, I was not very interested in the concept of newborn pictures and the non-sentimental side of me didn't understand the point.

Remembering our engagement and wedding photography sessions, the photographer makes all the difference.  Yes, talent is important.  But comfort with the photographer trumps all (in my opinion).  What made our newborn photography session so incredible was Rebecca's calm, sweet demeanor.  Obviously, she takes incredible pictures, but Rebecca also has a quiet confidence and commanding presence behind her camera.  She is so relaxed and personal that you kinda want her to stop taking pictures of your baby and hang out with you...or at least that is how I felt.  Aside from being incredibly professional and personal, she loves the babies.  She loved holding, swaddling and comforting Knox.  As she took pictures I would leave the room, let her do her thing, and come back in the room to find her comforting Knox and just loving on him.  You can tell Rebecca truly loves her job, and her clients (the babies that is).

After Rebecca left our house, I was so thankful for the experience.  It was so sweet to spend time with Knox and Andrew and have someone capture those new and tender moments of us as a family. Looking back, I don't think I would have been able to handle the session if Rebecca was not our photographer- she made it so easy and seamless.  When we got our pictures back, I was overjoyed that we had decided to take these pictures.  At the time Knox was only a week old.  Now he is almost six weeks old and he has changed so much and we have Rebecca to thank for capturing such amazing, natural pictures of him!


Wednesday, March 25, 2015

Newborn Photography


Have you ever, or do you plan to get newborn portraits done?  Honestly, the thought never crossed my mind till I was approached by a friend who is a photographer. A newborn photographer at that.  Even after we decided to get the pictures done, I had no idea what to expect.  Would Knox be posed in a quizzical position wearing a bear costume??  Or would he be sitting in a basket swaddled in a blanket holding an ice cream cone (this image comes to mind)?  I guess I have been looking at newborn announcements at the doctors office for months and have seen such a wide variety of photography styles.

I'm not going to speak too much about the experience, I will do that in a later post.  However, I wanted to give a sneak peak at some of the photos.  When the rest of the photos come in, I can tell you all about our photographer, her style and our experience!


Monday, March 16, 2015

A Chat with the Nancy Lee, President of MyRegistry.com


What if you could create a registry and put anything you wanted on it?  From any store, any place on the internet.  Does that exist, can it be that easy?  The answer is yes and yes and the website that will solve all your registry blues is MyRegistry.com

I recently used MyRegistry.com for a baby registry and I never dreamed that out of a registry I would have an opportunity to speak with Nancy Lee, the President of the company. On our phone call Nancy was warm, witty and hilarious...I think I was expecting the conversation to be much more dry and corporate due to false stereotypes of the business ladies ruling the industry.  Don't get me wrong, Nancy knows her stuff and is very successful in her field, but she still carried an ease and poise (and cracked several jokes) in conversation even though it was 5pm, nearly the end of a long work day.

Although I had already written a review for MyRegistry.com before our phone date, this phone conversation made me appreciate the site and business even more.  I was exposed to background information that I had not sought out while creating my registry, and learned more about the versatility of the site.

Now a little company history for you. The brain child and founder of this registry site was actually a Wall Street business man.  First misconception, I figured it was probably a lady.  Anyway, he created the site with a desire for people to be able to collect all the gift ideas they had for themselves, for any life occasion and in one place. Boom. The lightbulb went off and MyLifeRegistry.com was created in 2005.  Although MylifeRegistry was the original name, it was changed to myregistry.com in 2006.  Nancy Lee, the current President, joined the company in 2007 after working for a women's TV network in Japan for several years.  Once Nancy joined the team and MyRegistry.com solidified their niche in the internet registry world, the company has continued to grow and expand each year.

After receiving this history lesson from Nancy, I then asked, "Why is there a need for MyRegistry.com?" Her reply was quick and simple, "because you can't find everything you want and need from one store."  So true.  I think of my weekly grocery excursions.  Every Saturday I go to "the" grocery to buy our weekly items.  "The" grocery means I am actually going to three different stores because no one store has every item I want or all the prices I desire.  And I can testify to Nancy's response when it comes to creating a registry.  For all the baby shower items on my registry, I used a total of five stores.  There is no way I would put five stores on my shower invitation, but grabbing items from five stores on MyRegistry.com was simple and helped me get everything I wanted/needed.

Chatting with Nancy made me realize that I did not utilize the website to the best of my ability.  One of the best features, that many may not be aware of, is that a user can create a cash fund for people to contribute to.  For the couple in NYC who already have a fully stocked apartment but want to receive money for their honeymoon, this is for you!  How about creating a registry for your first daughter going to college?  She can register for bedding, decorations, a towel wrap (those were cool at Clemson), curtains, kitchenware, etc.  Kids can even use this site for Christmas ideas and birthday hints for mom and dad.  The versatility of this site goes on and on.  I never considered that people used MyRegistry.com for anything other than a wedding or baby shower, so I was blown away to hear about the different and creative ways people utilize it.

After talking to Nancy, I have a new found respect and interest in MyRegistry.com.  Before our phone call, I thought my registry days were over since I am already married and am about to have my first baby in a little over a week.  But now that I am aware of all the different ways I can utilize the site you better believe I will.  I have a birthday coming up in the beginning of April and will certainly create a little wish list of gifts for my husband to choose from   :)

I will end with this- one of Nancy's hilarious jokes.  "You get to marry one guy, but you don't have to marry one store."  Couldn't be a truer statement out there when describing the registry dilemma.  Ladies, I think we found our answer to the registry blues.

*In the picture above Knox is in his Boba carrier, something we registered for and already love!  He clearly enjoys it as well.

Meet Knox


Hey everyone, meet Knox Newman!

Knox Downey was born on March 12th, at 2:19am and weighed in at 7.4 lbs with a height of 20.5 inches.  Still can't fully report on the hair color, it looks to be a golden red...so maybe that will translate to a strawberry blonde???  Knox is healthy and happy to be at home.  Sorry all the pictures are a bit fuzzy...not easy to take pictures with one hand while holding a baby!

Now a word from Knox...

Hi, I'm Knox and I'm 5 days old.  Not much has happened in my first five days of life.  We were in the hospital for a few days and then came home to a house where I will be living.  The best part about coming home was meeting my brothers Cash and Boone.  They are so KEWL.  Sometimes they lick me in the face or on my hands, but mostly they just sniff me....I guess I smell good?  During the day i get to hang out with mom and dad.  Dad likes to read to me and mom and I have been watching a lot of shows that have food on it- but she has yet to make me something that I have seen on TV.  My hobbies are eating, sleeping, making funny noises and chewing on my hands.  I guess that is all to report right now.  I think I'm going to take my eighth nap for the day.


Sunday, March 8, 2015

How to Ice a Cake


I always love an excuse to bake a cake. While doing so, I feel transported back in time to my bakery days and I not only have deja vu, but I miss my co-workers and all the funny happenings and jokes that occurred daily.  Oh, sigh and a tear.

My mom's birthday was this past week and we celebrated with dinner and cake at our house.  She is a chocolate lover, so I made a classic chocolate cake with chocolate icing.

For the chocolate cake, I used a vegan recipe that is killer (no one can ever tell, so I never mention it).  I do alter the recipe I have and use coffee instead of water.  I think the coffee brings out the flavor of the chocolate.  As for the icing.  Unfortunately, I never follow a recipe, I go by the look of the icing.  When you make icing by the LARGE batch at a bakery, you start to get an idea of what good icing looks and tastes like.  I will post more about my icing recipe later this week.

Today, we are going to talk about icing a cake.  I think I will have to do a video post about this topic at some point, but for now, I will just give some verbal direction, pointers and tips.  Let me preface and say that most of what I know about icing cakes I learned at the bakery, a few tips I have picked up along the way. Here goes!


Let's start with some icing and your half naked cake.  First step.  Put a generous amount of icing in between your cake layers.  Spread the icing out, making sure to rarely pick up your icing tool off the cake.  If you pull the spatula off the icing, you can pull cake off with it and have crumbs in your icing.  Crumbs in your icing looks so pretty.  Not true. Make sure your icing layer is even.  Gently place your second cake layer on top.  Now cover your whole cake with plastic wrap and put in the fridge for about 30 minutes.  This step is very important, it will help your layers set so they don't slide or crack.  Once you take your cake out of the fridge put a big glop of icing on top, like the picture above.  Slowly work the icing in an even layer from the middle of the cake towards the edge. Again, try to do this without lifting your spatula very much.  As you get the icing in an even layer towards the edge of the cake, you can start to bring the icing down over the edge and onto the side like the picture below.


As you begin to cover the whole cake with icing, make sure you are putting an even layer all the way around.  The easiest way to ice a cake is by having a cake spinner.  While you are icing your cake with one hand, you move the cake spinner with the other, this process helps to keep the icing even.  Sadly, I don't have a cake spinner so I just move my cake platter with one hand, which works, but not well compared to a real spinner. 

When you achieve the desired thickness of icing on your cake you will want to smooth the top and sides of your cake.  You may want your cake to look smoother than this, but that all depends on what you plan to do in the next step.


Shadow slice.

I decided to swirl the top of my cake, but leave the sides smooth.  To make a swirl in your icing, it is actually very easy if you have a cake spinner, a bit harder if not.  You want to angle the tip of your icing spatula into the center point of the top of the cake.  Then spin the cake holder around in a circle with your other hand while working your icing spatula in a circle.

Now for the border.

You can do any sort of border.  The one shown above is pretty basic and seen on most cakes.  It is a small star tip or 1A icing tip.  If you don't have an icing bag, use a zip-lock bag.


After doing the border you are ready to decorate, or maybe you want the cake to be sans decorations! My mom loves raspberries so I decided to add some color and fruit to make the cake pop a bit more.


Hooray for chocolate cake!  Stay tuned for an icing recipe later this week.  Unless our baby comes... then you will just have to wait.